In Azure, all virtual machine disks are encrypted at rest. This means that the VM disk files are on an encrypted physical disk in the Azure data centre. This won’t prevent a disk being downloaded as a VHD using Azure Storage Explorer however, as the disk will become unencrypted when downloaded. See https://docs.microsoft.com/en-us/azure/virtual-machines/disks-use-storage-explorer-managed-disks
To add an additional layer of security it is recommended to encrypt the disks using Azure Disk Encryption. This leverages BitLocker technology (in Windows VMs) to further encrypt the virtual disks with disk encryption keys. Azure Disk Encryption requires the use of an Azure Key Vault to store the key used to encrypt the disk.
Encrypting VM Disks in the Azure Portal (Windows VMs)
First thing to do is to create an Azure Key Vault. Go to Key Vaults in the Azure portal and click Create.

Assign a relevant name and resource group. Ensure the Key Vault is created in the same region as the VM(s) you want to encrypt.

Ensure ‘Azure Disk Encryption for volume encryption’ is checked on the Access policy tab.

For the purposes of this article, I’ve left tags and networking as default.
Once the Key Vault is created, go to the VM you’d like to encrypt and select disks from the Settings bar:

Select ‘Additional Settings’

In this menu, select the Azure Disk Encryption settings. Choose whether to encrypt OS or OS and data disks:
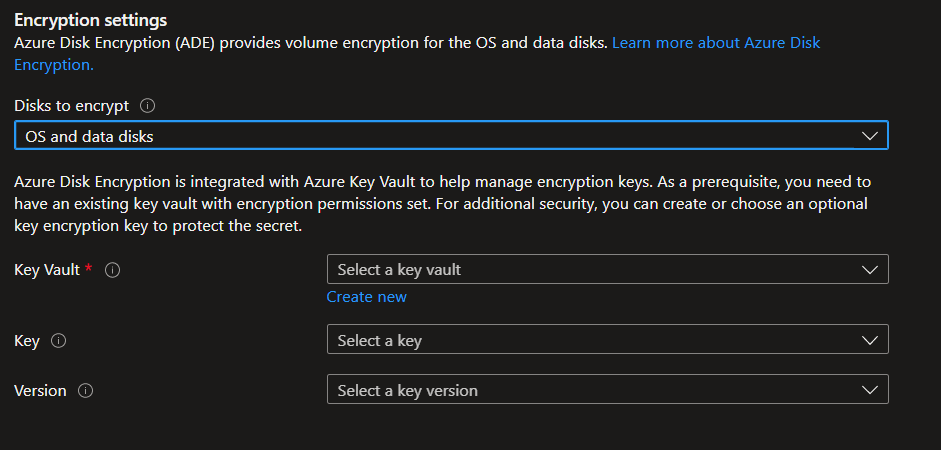
Select the previously created Key Vault from the drop down. Optionally choose a Key and version should you want to encrypt the encryption key (i.e. double encryption). If you do not select a Key and version, then the Windows VM will be encrypted using BitLocker with a simple string which is stored as a ‘Secret’ in KeyVault. You will see this in the KeyVault listed as type BEK for ‘BitLocker Encryption Key’:

If you wanted to encrypt this secret again you would do so using a Key Encryption Key, KEK, in the KeyVault. You would also need to first create a Key (not to be confused with a Secret) in your KeyVault before starting any encryption. To do this, go to your Key Vault, select Keys from the side bar and click Generate/Import:


Give a name, and optionally modify the Key Type and Key Size:
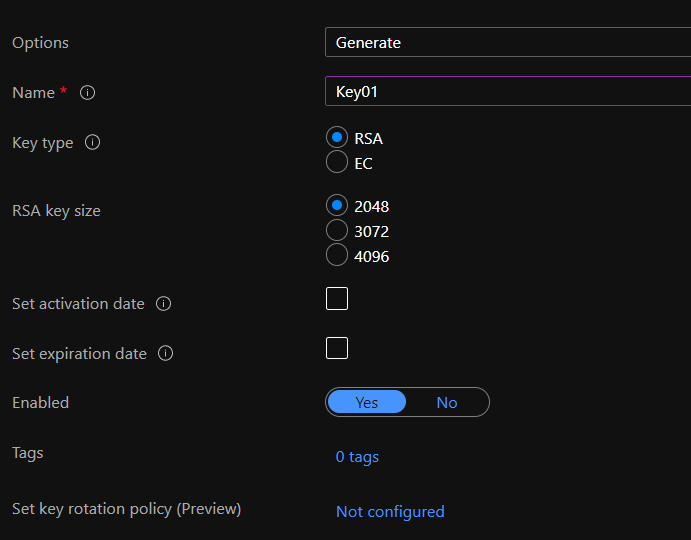
Once the key is created, it will contain a single ‘version’. You can see the versions by clicking on the key in the list of keys in your KeyVault in the portal.
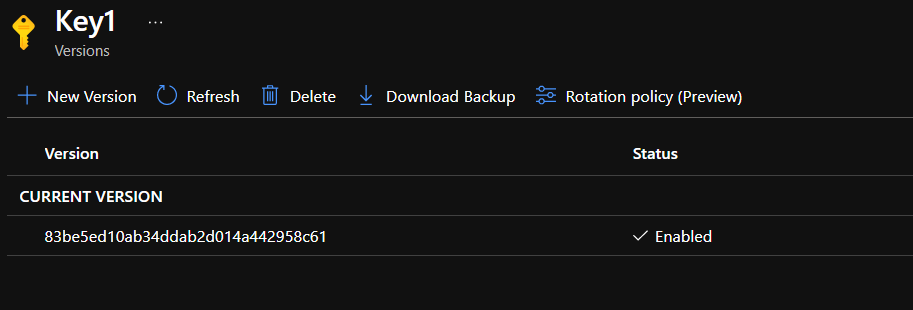
As far as I know it is not possible to encrypt the BEK with a Key Encryption Key after the VM is encrypted, you would have to decrypt the VM and then re-encrypt. Similarly, if you wanted to rotate your key to a new version you would need to decrypt and then re-encrypt.
Going back to the Disk Encryption screen, once you click ‘Save’ the disk will begin encrypting. This can take up to a number of hours depending on how large the disk is.
To check the status of a VM disk’s encryption you can run the following Powershell:
Get-AzVmDiskEncryptionStatus -ResourceGroupName “MyVirtualMachineResourceGroup” -VMName “MySecureVM”
Similarly, to decrypt an Azure VM’s disk and remove Azure Disk Encryption you can either set the ‘Disks to Encrypt’ setting to ‘None’ or run the following cmdlet:
Disable-AzVMDiskEncryption -ResourceGroupName “MyVirtualMachineResourceGroup” -VMName “MySecureVM”

Copying Disk Encryption Keys for Azure Sire Recovery
Once your VM is encrypted, protecting it using Azure Site Recovery (ASR) requires the encryption keys for the replicated disks to be copied to another KeyVault in the target region. Officially, the only way to do this is to use a Microsoft provided script to copy these keys. This needs to be run once, as the keys won’t change but will need to be run subsequent times should any further VMs be built and/or encrypted:
To automate this process, I’ve configured Azure Automation to periodically copy keys and secrets using a Powershell script.
What is Azure Automation?
Azure Automation is a service in Azure that can be used to automate Powershell runbooks as well as manage updates and provide desired state configuration management.
First, we need to create an Azure automation account. Go to Automation accounts and click Create:

Give a relevant name, resource group and ideally in the same region as your source key vault:

Once this is done, we need to create a ‘Run-as’ Account. This is an Azure AD account which has the permissions required to retrieve the secrets and/or keys from the source Azure KeyVault. To create this, select ‘Run-as’ accounts from the side bar in the Automation account and click Create:

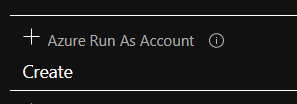
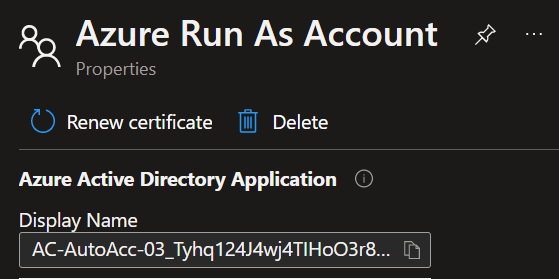
On clicking ‘Create’, Azure actually goes and creates a service principal in the Azure AD tenant and grants it ‘Contributor’ rights to the subscription this operation is taking place in. You can manually re-assign the permissions of the run-as account in Azure AD should you want to, as Contributor rights to the entire subscription is excessive for the minimum permissions required. The account used to create this run as account will also need permissions to create Azure AD objects (Global Admin for example). Please note that the certificate used to authenticate as the Run-as account needs to be renewed every year or your automation will start to fail. To renew this certificate, click on the Run-as Account and click on the ‘Renew certificate’ button.
Take note of the Run as account Display name as it will be required in the next step (this should be the name of the Automation account followed by a string):
More information on Azure Automation Run As accounts is available here:
https://docs.microsoft.com/en-us/azure/automation/manage-runas-account
Grant Permissions to Run as account to Key Vault
By default, the new run as account won’t have permission to retrieve keys and secrets from the KeyVault. To grant these permissions, go to the KeyVault and select Access policies from the side bar. Select Add Access Policy.


Select ‘Key & Secret Management’ from the ‘Configure from template (optional)’ dropdown.
Click ‘Select Principal’ and search for the run as account in Azure AD.
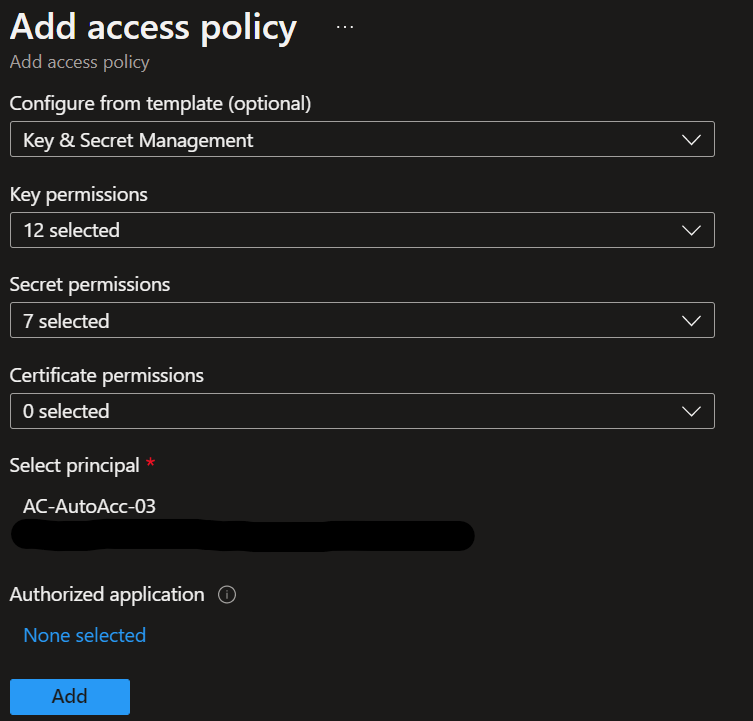
Click Add. This will have to be done on both source and destination key vaults.
NOTE: This will be different if you are using Azure Role-based Access Control (RBAC) to control access to the KeyVault. More info on this below:
https://docs.microsoft.com/en-us/azure/key-vault/general/rbac-guide?tabs=azure-cli
Powershell Runbooks
After creating the run as account and granting permissions the next step is to create the Powershell script that will perform the copy. To do this, go to ‘Runbook’s in your Azure Automation account and click ‘Create a runbook’


Give a relevant name, select Powershell and a relevant version from the dropdowns:
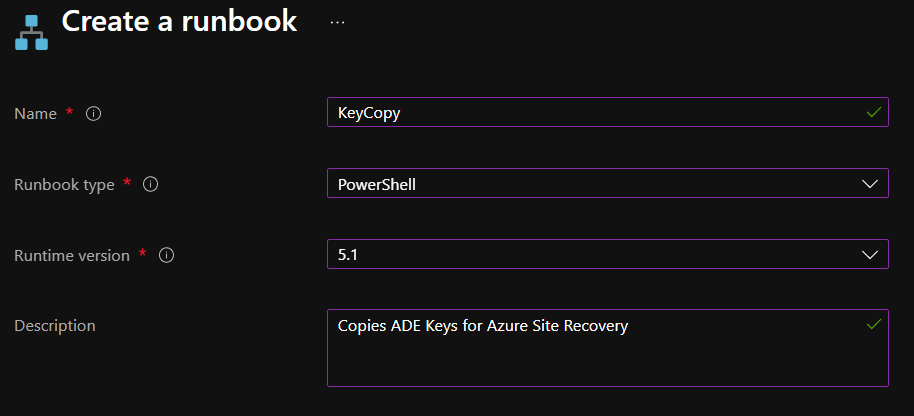
Once the Runbook is created you can edit it in browser by clicking on it in the list of Runbooks and clicking ‘Edit’:

I’ve written two scripts depending on the encryption scenario. If using BitLocker Encryption Keys (and no Key Encryption Keys), then use the following (SCRIPT 1):-
## Source and Destination Vaults (needs to be set)
$sourceVaultName = “SourceKeyVault01”
$destVaultName = “DestinationKeyVault02”
## Connect to Azure as Automation account
$Conn = Get-AutomationConnection -Name AzureRunAsConnection
Connect-AzAccount -ServicePrincipal -Tenant $Conn.TenantID -ApplicationId $Conn.ApplicationID -CertificateThumbprint $Conn.CertificateThumbprint
## Copy Secrets from Source to Destination$secretNames = (Get-AzKeyVaultSecret -VaultName $sourceVaultName).Name
$secretNames.foreach{
Set-AzKeyVaultSecret -VaultName $destVaultName -Name $_ `
-SecretValue (Get-AzKeyVaultSecret -VaultName $sourceVaultName -Name $_).SecretValue
}
This script recursively copies all secrets from the Source Key Vault to the Target. Note that you will need to change the variables at the top to the names of the Key Vaults in your environment.
If using Key Encryption Keys, then use the following (SCRIPT 2):
## Set Source and Destination Key Vault
$sourceVaultName = “SourceKeyVault01”
$destVaultName = “DestinationKeyVault02”
## Connect to Azure as Automation account
$Conn = Get-AutomationConnection -Name AzureRunAsConnection
Connect-AzAccount -ServicePrincipal -Tenant $Conn.TenantID -ApplicationId $Conn.ApplicationID -CertificateThumbprint $Conn.CertificateThumbprint
## Copy Keys
## Temporary location to backup keys + certs
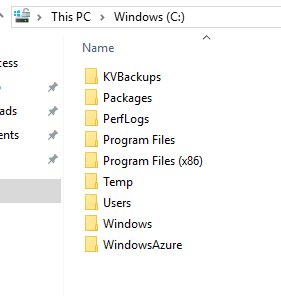
$backupfolder = “C:\KVBackups\”
## Backup Keys from source Vault to temp location and then restore to destination vault
$keyNames = (Get-AzKeyVaultKey -VaultName $sourceVaultName).Name
$keyNames.foreach{
$backuploc = $backupfolder + “$_” + “.key”
Backup-AzKeyVaultKey -VaultName $sourceVaultName -Name $_ -OutputFile $backuploc -Force
Restore-AzKeyVaultKey -VaultName $destVaultName -InputFile $backuploc
}
This script will recursively copy all keys from source to destination key vault. If using both BEK and KEK, then either the scripts can be combined, or both scripts can be run as per a schedule.
Once finished editing the scripts, remember to select ‘Publish Script’ to finalise the script and make it ready to run.

In the key copy script, there is reference to a ‘Backup Folder’ as it will need to download the key as a .zip from the source key vault and upload it to the destination key vault. This requires the use of an Azure Automation hybrid worker – an agent that you install onto a Windows VM which will run the Powershell script.
As the BEK copy script doesn’t require a hybrid worker to copy keys, it’s much simpler to encrypt your VMs with BEK keys and not KEKs.
Install and Register a Hybrid Worker
If your Windows VM that will run the hybrid worker is running in Azure, you can simply install an extension on the VM (although at time of writing this is still in preview). If it’s on-premises you will need to follow this guide:
https://docs.microsoft.com/en-us/azure/automation/automation-windows-hrw-install
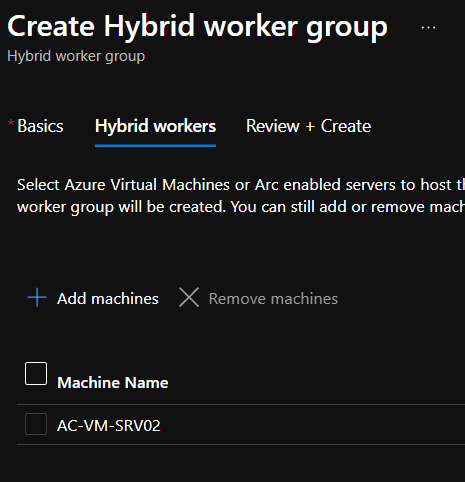
To install the extension simply go to your Automation account, select Hybrid worker groups from the side bar and create a new group:


NOTE: This script runs on a ‘User hybrid group worker’
Give the hybrid worker group a relevant name and add the VM you would like to install the extension on:
Also ensure that the VM has the folder created on it’s hard disk that is referenced in Script 2.
Schedule and Run runbook
The final step is to schedule and run the runbooks in Azure Automation.
To do this, go to schedules in the Automation account. Click add a schedule:


Add in the schedule to run the script, I’ve set mine to run every day at 11pm:
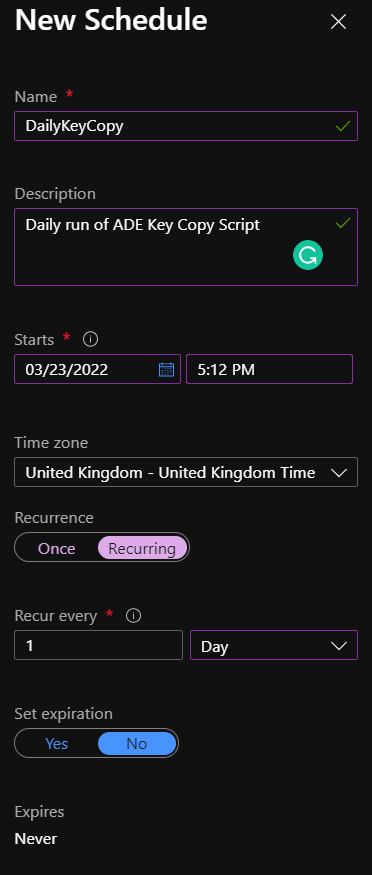
Once the schedule is created, go back to your scripts and choose ‘Link to schedule’

Once this is complete, Azure will automatically run your script according to your schedule. Remember if using the KEK Copy script, to link to a hybrid worker otherwise it will fail.
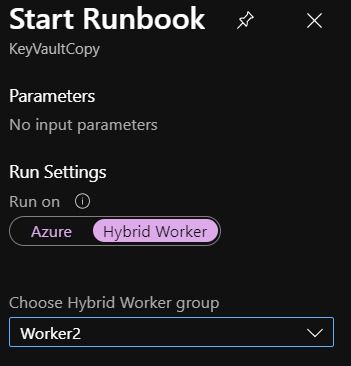
It is also worth testing that script will complete with no errors by using the ‘Start’ option to manually start a runbook. Once completed, you should be able to see the keys/secrets copied between Key Vaults:

Final Thoughts & Further Reading…
It is possible to create hybrid runbook worker to run on a container instead of having to use a fully blow Windows VM, to save on compute costs. I think however unless if really required, encrypting VM disks with BEKs and then using Script 1 above to copy to a schedule is sufficient and won’t require a hybrid worker VM to be running.
Last year, Microsoft released a new option for VM encryption, host-level encryption. This takes away the need for BitLocker keys and encrypts the VM disks at host level rather than in the Guest OS. This means encryption is supported across all operating systems (not just Windows and certain flavours of Linux). It also takes away the requirement for VM resources to be used for the encryption and decryption process. I’ve yet to implement this in a production environment and to see how it behaves when using Azure Site Recovery, but perhaps this is a good topic for a future blog post!
Creating a Key Vault for Azure Disk Encryption:
https://docs.microsoft.com/en-us/azure/virtual-machines/windows/disk-encryption-key-vault
Replicate Azure Disk Encryption-enabled virtual machines to another Azure region:
https://docs.microsoft.com/en-us/azure/site-recovery/azure-to-azure-how-to-enable-replication-ade-vms
Azure Host-Level Encryption:
https://docs.microsoft.com/en-us/azure/virtual-machines/disks-enable-host-based-encryption-portal
Azure Disk Encryption options:
https://docs.microsoft.com/en-us/azure/virtual-machines/disk-encryption-overview
